 Left Navigation Menu


Create a Résumé Step-by-Step Using the Wizard
Overview
The Résumé Wizard is a step-by-step tool that helps you easily build a résumé. Think of it as a guided form that collects your information (work history, education, skills, etc.) and formats it into a top-notch résumé that employers can easily search and view.
Résumé Options — Résumé Wizard
Where to Find This Feature
-
Top menu bar > Résumé icon > Résumé Manager button or Create, Edit, or Upload a Résumé thumbnail icon > Add Résumé thumbnail icon
-
Left navigation menu > Quick Menu > Résumé Builder > Add Résumé thumbnail icon
-
My Dashboard > Widgets > Job Seeker Services widget > Résumé Builder link > Add Résumé thumbnail icon
-
Directory of Services > Services for Individuals > Job Seeker Services icon > Résumé Builder icon> Add Résumé thumbnail icon
There are two links available to assist in preparing you prior to launching the Résumé Wizard from the Résumé tab of your Employment Plan Profile:
-
To view 10 steps you can follow to successfully achieve employment, select the Tips on preparing your résumé link. See Interviewing Best Practices for additional information.
-
To create and manage introductory letters that can be included with your résumés when contacting employers, select the Cover Letter link. See Manage Your Messages and Letters for details.
Steps to Create Your Résumé
Your site may display different options from those shown here.
-
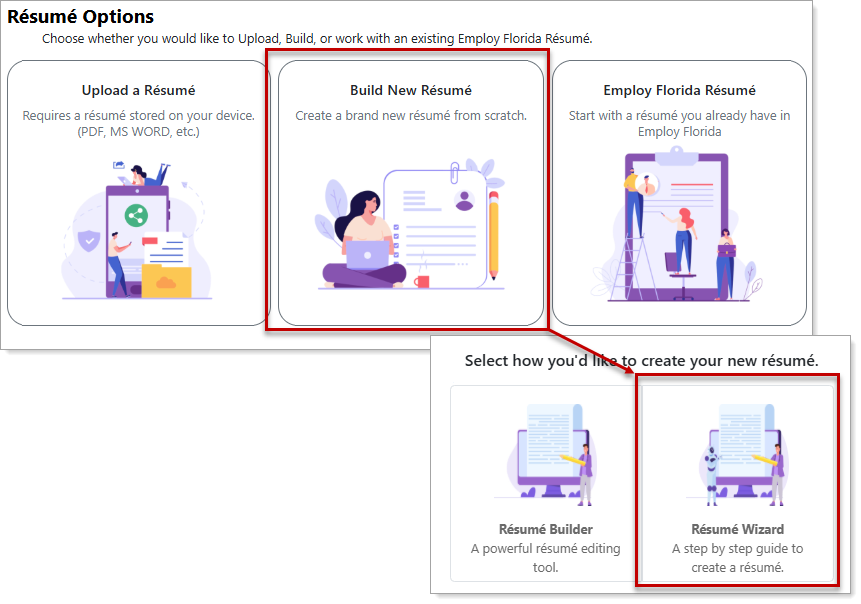
Choose the Build New Résumé option.
-
Select the Résumé Wizard option in the pop-up window that displays. Another pop-up may display, asking "Do you want to save your résumé nationwide?"
-
To save your résumé nationwide , check the authorization box and then the Yes button.
-
-
On the Résumé Access page, select the Yes or No option for whether you want your résumé to be available online for employers to view and select the Next button. A confirmation pop-up appears.
-
To agree to share the information displayed on your résumé, select OK. The Résumé Builder Wizard opens on the Desired Location page.
Once you complete all required sections and share your résumé, it is available to employers online, which means that any registered employer can view the information included in your résumé. You cannot limit visibility to certain employers while allowing access to others.
If you want to create your résumé now, but are not yet ready to make it public, decline the option. You can set it to ‘Online’ at any time when you are ready for employers to see it.
-
-
Complete the wizard pages (see the section below for information on each area), and at the end, select the Finish button to create your résumé. Your résumé is created and displays on the Résumé Builder page, where you can review and modify it as needed. See Work with Existing Résumés for additional information. In addition, a list of Suggested Jobs Based on Your Résumé displays at the bottom.
Complete the Résumé Wizard
The Résumé Wizard consists of several pages of information that directly correlate to the Background tab of your Personal Profile. As you progress through the wizard, the progress bar at the top turns green. Many pages include an Update background information with the selected [Item] checkbox (enabled by default) to keep your background information aligned with your résumé. You may also see a checkbox to Update all résumés with the..., which lets you apply the information to all your saved résumés. Leave it unchecked to keep the changes for the current résumé only.
The Résumé Wizard includes the following pages. The links provide details on managing the information:
Employer Searchable Items
-
Desired Location — Specify Your Desired Job Location
-
Desired Occupation — Specify Your Desired Occupation
-
Desired Salary — Specify Your Desired Salary
-
Desired Job Type — Specify Your Desired Job Type
-
Driver License — Add or Edit Driver's License Information
-
Specialist Knowledge — See the following topics:
Résumé Display Items
-
Contact — Edit a Résumé and Manage Your Registration Information
-
Websites — Add or Edit Your Website Links
-
Résumé Layout Templates — Work with Résumé Templates
-
Objective — Add or Edit Résumé Objective
-
Ability Summary — Add or Edit Résumé Ability Summary
-
Employment History — Add or Edit Employment History
-
Job Skills — Add or Edit Job Skills
-
Technical Skills And Tools — Add or Edit Tools and Technology
Tips for Success
Before You Start:
-
Know your target role — Decide what type of jobs you want. This helps you tailor wording, keywords, and achievements to match.
-
Collect your details first — Gather your work history, education, certifications, and key achievements so you’re not scrambling mid-process.
-
Think in achievements, not just duties — Employers want to see results, not just responsibilities.
While Using the Wizard:
-
Use action verbs — Start bullet points with strong words like led, designed, implemented, improved, reduced, boosted.
-
Focus on outcomes — Pair duties with results, e.g., “Increased sales by 20% through improved client outreach strategy.”
-
Customize job titles/descriptions — Match wording to the job description you’re applying for (without exaggerating).
-
Highlight keywords — Many sites use Applicant Tracking Systems (ATS). Pull phrases directly from the job posting (e.g., “project management,” “data analysis,” “customer success”).
-
Be concise — Keep bullet points one or two lines long. Avoid paragraphs in work history.