


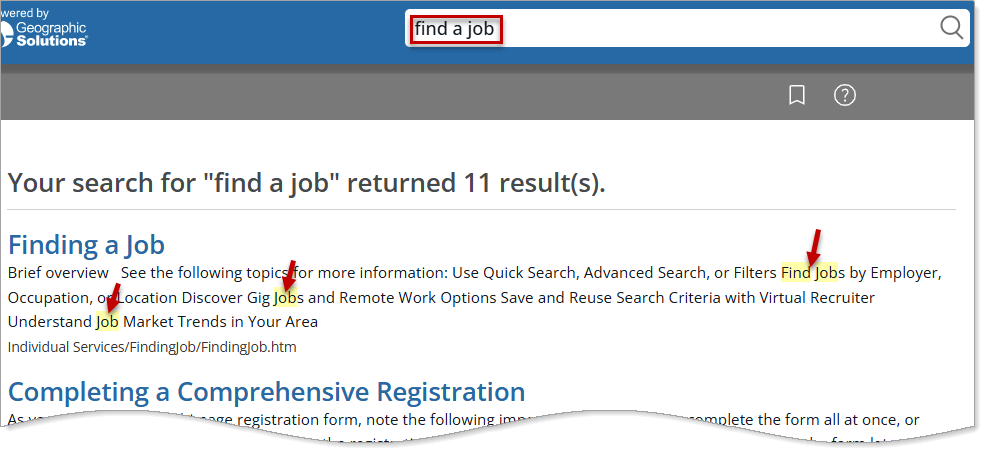

Specify Your Desired Job Type
Overview
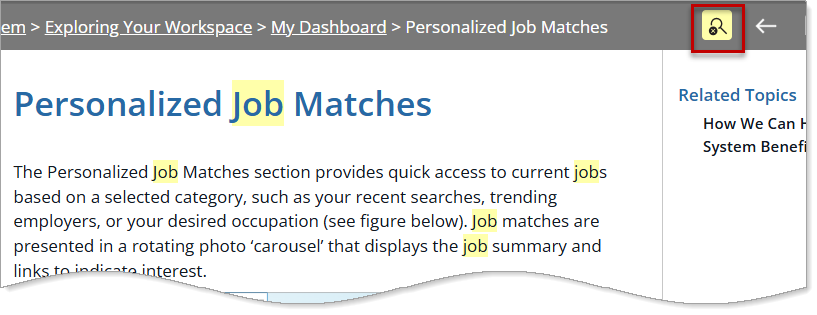
When you state your availability up front, recruiters immediately know if your schedule aligns with the role. This avoids wasted interviews for jobs that don’t fit your needs. If you prefer remote, hybrid, or specific shifts, saying so filters out mismatched positions and increases the chance that you’ll be contacted for jobs that truly fit your lifestyle.
Personal Profile – Background Tab – Additional Employer Searchable Items – Desired Job Type Details
Where to Find This Feature
-
Header bar > Profile icon > Background tab > Additional Employer Searchable Items > Desired Job Type section > Add a New Desired Job Type link
-
Left navigation menu > Quick Menu > My Portfolio > My Individual Profiles > Personal Profile > Background tab > Additional Employer Searchable Items > Desired Job Type section > Add a New Desired Job Type link
-
The [your name] link in the Welcome statement on the dashboard > Background tab > Additional Employer Searchable Items > Desired Job Type section > Add a New Desired Job Type link
Steps to Specify Your Desired Job Type Profile
Your site may display different options from those shown here.
-
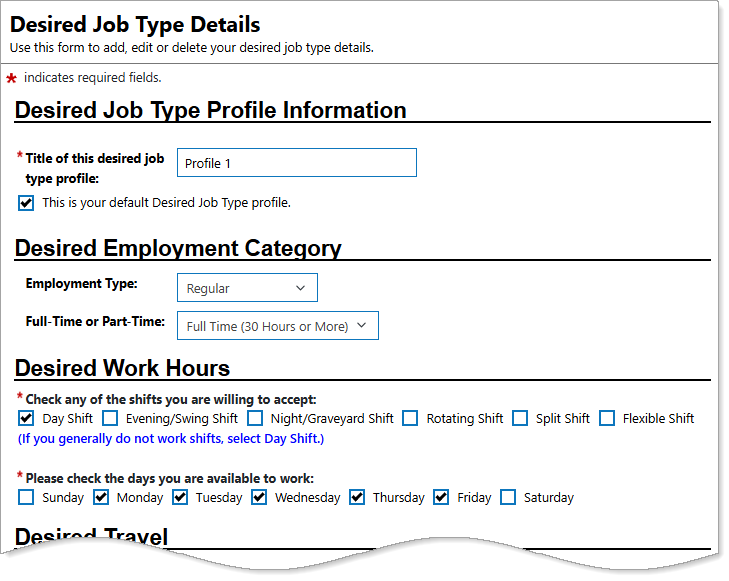
Enter the name of the profile and check the box if This is your default Desired Job Type profile in the Desired Job Type Profile Information section.
-
To specify the Employment Type and Full-Time or Part-Time, select your preferences from the drop-down lists in the Desired Employment Category section.
-
In the Desired Work Hours section, check the boxes for the shifts and days you are available for work.
-
To specify a willingness to travel, do so in the Desired Travel section.
-
Specify Are you willing to relocate? and Are you willing to work remotely or Work at Home? from the drop-down lists in the Relocation/Remote Work/Work at Home section.
-
To enter additional information, use the text box in the Description section.
-
Enter your text using any of the following methods:
-
Type it in manually.
-
To display your text templates that you created, select the Text Templates link :
-
To view the contents of the template, select the magnifying glass icon in the Preview column.
-
Select the link in the Description column to apply the template to your text field.
-
Select the Manage Saved Text link to navigate to your Saved Text Template page, where you can create and manage your templates. See Manage Your Saved Text Templates for details.
-
To view a list of impactful terms that convey initiative and achievement, select the Action Words tab. A filterable list of verbs, divided by category, displays—select the words you like to add them to your text.
-
-
To enter system-generated text based on the context in which it is being created, select the Insert Sample Text link. Some text entry fields do not have this link (e.g., email messages).
-
To use template variables (if available)—these are placeholders that get replaced with actual data when the message is generated—select the Insert Variable link, and then select a variable from the list, such as name, address, etc.
-
-
To enhance your content, use the formatting tools at the top to bold, italicize, create bullet lists, adjust colors, include images, and more—adding clarity, emphasis, and visual appeal.
-
To remove the entry, select the Clear Text link.
-
To remove bold, italics, bullets, etc., but leave the content, select the Remove All Formatting link.
-
Select the Save button to return to the Background tab or the Next button in the background wizard to save and proceed to the next page.
You can have multiple desired job type profiles to meet differing job search criteria.
 Customize your text
Tips
-
Do not limit yourself too much – If you’re flexible, say so — being too restrictive may eliminate you from good opportunities.
-
Update Regularly – If your availability changes, adjust your profile so employers always see accurate info.