


Edit a Résumé
Overview
Your résumé should always showcase your most recent roles, skills, and accomplishments. Regular updates help ensure it reflects your current experience rather than appearing outdated. By refreshing your résumé, you can highlight the achievements and abilities most relevant to the job, include keywords from a job posting to improve your chances of passing applicant tracking systems (ATS), and create a format that’s easy for recruiters to scan quickly—which is how most résumés are reviewed.
How Résumé Updates Affect Your Profile and Other Résumés
Changes to your résumé information can carry through to your Personal Profile and other résumés. In some cases this occurs automatically and in others, you can decide what is updated. The table below provides information on how changes occur in the system.
 Résumé Change Effect Table
|
Résumé Section |
Profile Background and/or All Résumés Updated Automatically |
Optional Update to Profile Background and/or Résumé |
No Update to Profile Background or Other Résumés |
|---|---|---|---|

|
|||
|
|
|||
|
|
|||
|
|
|||
|
|
|||
| Images |
|
||
| Objective |
|
||
| Ability Summary |
|
||
| Employment History |
|
||
| Education History |
|
||
| Occupational Licenses, Certificates and Training |
|
||
| Honors & Activities |
|
||
| Additional Information |
|
||
| Detailed References |
|
||
| Desired Occupation |
|
||
| Desired Salary |
|
||
| Desired Job Location |
|
||
| Desired Job Type |
|
||
| Drivers License |
|
||
| Security Clearance |
|
||
| Job Skills |
|
||
| Tools and Technology |
|
||
| Typing Speed |
|
||
| Language/Proficiency |
|
||
Where to Find This Feature
-
Top menu bar > Résumé icon > Résumé Manager button
-
Left navigation menu > Quick Menu > Résumé Builder
-
My Dashboard > Widgets > Job Seeker Services widget > Résumé Builder link
-
Directory of Services tab > Services for Individuals > Job Seeker Services icon > Résumé Builder icon
Steps to Edit Your Résumé
Your site may display different options from those shown here.
-
Open your résumé for editing on the Résumé Builder page by selecting a résumé thumbnail.
-
To apply a template, select the Template button in the upper right and choose from the list. See Apply a Different Template to a Résumé for details.
-
Select the sections you want to modify on the System Résumé and Searchable Items tabs (described below). Pop-up windows display for each with detailed information available for editing.
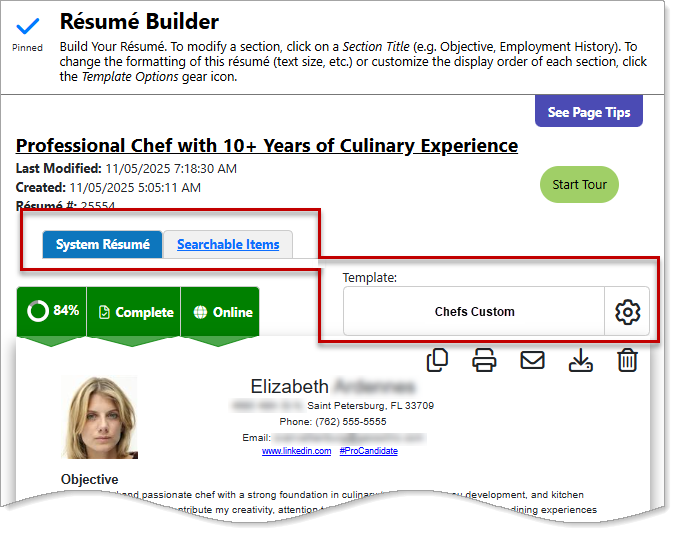
Résumé Builder — System Résumé and Searchable Items tabs, and Template Button
System Résumé Tab
The System Résumé tab contains the information items included in your résumé that employers and recruiters see, like your education and work histories.
Résumé Title
-
To change your résumé title, select it, enter the new title, and select the Save button.
Contact Information
Changes made here automatically update your Personal Profile and any other résumés you saved to the system.
-
Enter or change information as needed in the Name, Residential and Mailing Addresses, Phone Numbers, E-Mail Address, and Images sections.
Residential Address
-
Enter the street address where you live in the Address Line 1 field.
-
To include your Apt #, Lot #, Building #, Suite #, etc., enter it in the Address Line 2 field.
-
-
Enter the Zip Code in the field provided.
-
To look up your ZIP code, select the Find zip code link to open the U.S. Postal Service website's Look Up a ZIP Code™ tool.
Once a ZIP code is entered, the page refreshes and the City, State, and County fields are automatically populated.
-
-
Review the selections for the items that you want to appear on your résumé and make changes as needed.
-
Select the Save button to save your changes.
Mailing Address
-
Check the box if the address where receive your correspondence is the same as your residential address.
-
Enter the address where you receive your mail in the Address Line 1 field.
-
To include an Apt #, Lot #, Building #, Suite #, etc., enter it in the Address Line 2 field.
-
-
Enter the Zip Code in the field provided.
-
To look up your ZIP code, select the Find zip code link to open the U.S. Postal Service website's Look Up a ZIP Code™ tool.
Once a ZIP code is entered, the page refreshes and the City, State, and County fields are automatically populated.
-
-
Review the selections for the items that you want to appear on your résumé and make changes as needed.
-
Select the Save button to save your changes.
E-mail Address
-
Enter your Primary E-mail address in the field provided.
-
To create an e-mail address in the event you do not currently have one, select the Create E-mail Account link to display a pop-up window containing a list of links to free e-mail services.
-
To view information on e-mail security and recommendations, select the Read Our E-mail Security Policy link.
-
Images
-
To change an existing résumé image or add one, use the options outlined in the table below:
Résumé Image Options To...
Do This:
Change an existing image
Select the Edit button and select a new image from the file picker.
Remove an image
Select the Delete button, and Ok to confirm.
Select an image to display on the résumé -
Choose the Select option.
-
Read the notification message, and select the Ok button.
The Page Position options are now available.
Determine where your image displays on the résumé Select the Left Corner or Right Corner Page Position option.
Upload an image -
Select the Choose File button and select an image from the file picker. Note the image specifications above the button for guidance on what is allowable.
-
Select the Submit button. Your image displays in the Images section and is automatically selected for inclusion on your résumé.
The image is now available for selection on any of your saved résumés (except uploaded).
-
-
Review the selections for the items that you want to appear on your résumé and make changes as needed.
-
To add or remove social media or websites to your résumé, select the Manage your Websites link.
-
Select the Save button to save your changes.
Objective
-
To change your Objective, select it to display a pop-up window.
-
Enter your objective and desired goals in the text field.
Customize your text
-
Enter your text using any of the following methods:
-
Type it in manually.
-
To display your text templates that you created, select the Text Templates link :
-
To view the contents of the template, select the magnifying glass icon in the Preview column.
-
Select the link in the Description column to apply the template to your text field.
-
Select the Manage Saved Text link to navigate to your Saved Text Template page, where you can create and manage your templates. See Manage Your Saved Text Templates for details.
-
To view a list of impactful terms that convey initiative and achievement, select the Action Words tab. A filterable list of verbs, divided by category, displays—select the words you like to add them to your text.
-
-
To enter system-generated text based on the context in which it is being created, select the Insert Sample Text link. Some text entry fields do not have this link (e.g., email messages).
-
To use template variables (if available)—these are placeholders that get replaced with actual data when the message is generated—select the Insert Variable link, and then select a variable from the list, such as name, address, etc.
-
-
To enhance your content, use the formatting tools at the top to bold, italicize, create bullet lists, adjust colors, include images, and more—adding clarity, emphasis, and visual appeal.
-
To remove the entry, select the Clear Text link.
-
To remove bold, italics, bullets, etc., but leave the content, select the Remove All Formatting link.
-
-
Select the Save button to save your changes.
See Add or Edit Résumé Objective for additional information.
Ability Summary
-
To change your Ability Summary, select it to display a pop-up window.
-
Enter a summary of your abilities and include any key skills in the text field.
Customize your text
-
Enter your text using any of the following methods:
-
Type it in manually.
-
To display your text templates that you created, select the Text Templates link :
-
To view the contents of the template, select the magnifying glass icon in the Preview column.
-
Select the link in the Description column to apply the template to your text field.
-
Select the Manage Saved Text link to navigate to your Saved Text Template page, where you can create and manage your templates. See Manage Your Saved Text Templates for details.
-
To view a list of impactful terms that convey initiative and achievement, select the Action Words tab. A filterable list of verbs, divided by category, displays—select the words you like to add them to your text.
-
-
To enter system-generated text based on the context in which it is being created, select the Insert Sample Text link. Some text entry fields do not have this link (e.g., email messages).
-
To use template variables (if available)—these are placeholders that get replaced with actual data when the message is generated—select the Insert Variable link, and then select a variable from the list, such as name, address, etc.
-
-
To enhance your content, use the formatting tools at the top to bold, italicize, create bullet lists, adjust colors, include images, and more—adding clarity, emphasis, and visual appeal.
-
To remove the entry, select the Clear Text link.
-
To remove bold, italics, bullets, etc., but leave the content, select the Remove All Formatting link.
-
-
Select the Save button to save your changes.
See Add or Edit Résumé Ability Summary for additional information.
Employment History
-
To add or modify your Employment History, select it to display a pop-up window.
-
To add an employment record, select the Add Employment History button.
-
Complete all required fields (marked with a red asterisk), and select the Save button.
-
-
To modify an employment record, select the Edit button.
-
Make changes as needed and select the Save button.
-
-
Removing an employment record can be accomplished in two ways:
-
To remove the record from both your résumé and your background profile information, select the Delete button and Ok on the confirmation.
-
To remove the record from your résumé only, uncheck the box in the Display on Résumé column.
-
-
Select the Save button to save your changes.
See Add or Edit Employment History for additional information.
Education History
-
To add or modify your Education History, select it to display a pop-up window.
-
To add an education record, select the Add a new Education History button.
-
Complete all required fields (marked with a red asterisk), and select the Save button.
-
-
To modify an education record, select the Edit button.
-
Make changes as needed and select the Save button.
-
-
To remove an education record, use one of the following methods:
-
Select the Delete button and Ok on the confirmation to remove the record from both your résumé and your background profile information.
-
Uncheck the box in the Display on Résumé column to remove the record from your résumé only.
-
-
To format the presentation of your education history, select the Change Format on this Résumé button. The Education History Section Only page displays.
-
Complete all fields to determine the appearance of information in the Education History section of your résumé, including date format and alignment, display order, and education descriptions.
-
Select the Save button to save and return to the Education and Training Edit page.
-
-
Select the Save button to save your education history.
See Add or Edit Education History for additional information.
Occupational Licenses, Certificates and Training
-
To add or modify your Occupational Licenses, Certificates and Training, select it to display a pop-up window.
-
To add an Occupational Licenses, Certificates and Training record, select the Add a new Occupation License(s), – Certificate(s) button.
-
Complete all required fields (marked with a red asterisk), and select the Save button.
-
-
To modify a record, select the Edit button.
-
Make changes as needed and select the Save button.
-
-
To remove a record, use one of the following methods:
-
Select the Delete button and Ok on the confirmation to remove the record from both your résumé and your background profile information.
-
Uncheck the box in the Display on Résumé column to remove the record from your résumé only.
-
-
Select the Save button to save your Occupational Licenses, Certificates and Training information.
See Add or Edit Occupational Licenses, Certifications, and Training for additional information.
Honors & Activities
-
To add or modify your Honors and Activities, select it to display a pop-up window.
-
Use the text box to enter, change, and format the information.
Customize your text
-
Enter your text using any of the following methods:
-
Type it in manually.
-
To display your text templates that you created, select the Text Templates link :
-
To view the contents of the template, select the magnifying glass icon in the Preview column.
-
Select the link in the Description column to apply the template to your text field.
-
Select the Manage Saved Text link to navigate to your Saved Text Template page, where you can create and manage your templates. See Manage Your Saved Text Templates for details.
-
To view a list of impactful terms that convey initiative and achievement, select the Action Words tab. A filterable list of verbs, divided by category, displays—select the words you like to add them to your text.
-
-
To enter system-generated text based on the context in which it is being created, select the Insert Sample Text link. Some text entry fields do not have this link (e.g., email messages).
-
To use template variables (if available)—these are placeholders that get replaced with actual data when the message is generated—select the Insert Variable link, and then select a variable from the list, such as name, address, etc.
-
-
To enhance your content, use the formatting tools at the top to bold, italicize, create bullet lists, adjust colors, include images, and more—adding clarity, emphasis, and visual appeal.
-
To remove the entry, select the Clear Text link.
-
To remove bold, italics, bullets, etc., but leave the content, select the Remove All Formatting link.
-
-
To Update background information with these Honors, select the checkbox.
-
To Update all résumés with these Honors, select the checkbox.
-
Select the Save button to save your Honors & Activities.
See Add or Edit Résumé Honors and Activities for additional information.
Additional Information
-
To add or modify your Additional Information, select it to display a pop-up window.
-
Use the text box to enter, change, and format the information.
Customize your text
-
Enter your text using any of the following methods:
-
Type it in manually.
-
To display your text templates that you created, select the Text Templates link :
-
To view the contents of the template, select the magnifying glass icon in the Preview column.
-
Select the link in the Description column to apply the template to your text field.
-
Select the Manage Saved Text link to navigate to your Saved Text Template page, where you can create and manage your templates. See Manage Your Saved Text Templates for details.
-
To view a list of impactful terms that convey initiative and achievement, select the Action Words tab. A filterable list of verbs, divided by category, displays—select the words you like to add them to your text.
-
-
To enter system-generated text based on the context in which it is being created, select the Insert Sample Text link. Some text entry fields do not have this link (e.g., email messages).
-
To use template variables (if available)—these are placeholders that get replaced with actual data when the message is generated—select the Insert Variable link, and then select a variable from the list, such as name, address, etc.
-
-
To enhance your content, use the formatting tools at the top to bold, italicize, create bullet lists, adjust colors, include images, and more—adding clarity, emphasis, and visual appeal.
-
To remove the entry, select the Clear Text link.
-
To remove bold, italics, bullets, etc., but leave the content, select the Remove All Formatting link.
-
-
To Update all résumés not using Federal Template with this additional information, select the checkbox.
-
Select the Save button to save your Additional Information.
See Add or Edit Résumé Additional Information for details.
Detailed References
-
To add or modify your Detailed References, select it to display a pop-up window.
-
To add a reference, select the Add New Reference button.
-
Complete all required fields (marked with a red asterisk), and select the Save button.
-
-
To modify reference details, select the Edit button.
-
Make changes as needed and select the Save button.
-
-
To change your reference's display order, use the arrows in the Display Order column.
-
To keep your references confidential for the time being, you can select the Display "References Available on Request" on this résumé checkbox. That text displays on your résumé rather than the names of your references.
-
Removing a reference can be accomplished in two ways:
-
To remove the reference from both your résumé and your background profile information, select the Delete button and Ok on the confirmation.
-
To remove the reference from your résumé only, uncheck the box in the Display on Résumé column.
-
-
Select the Save button to save your changes.
See Add or Edit Résumé Detailed References for additional information.
Searchable Items Tab
The Searchable Items tab lists extra details about your background and job preferences that aren't on your résumé. Employers and recruiters can use this information to find you when they search for candidates.
Desired Occupation
-
To modify your Desired Occupation, select it to display a pop-up window.
-
Use the drop-down list to choose an occupation or select the Search for an Occupation link to search for and select an occupation. See Search for an Occupation for additional information.
-
To Update background information with desired occupation, select the checkbox.
-
To Update all résumés with desired occupation, select the checkbox.
-
To view an Occupation Profile with information on wages, demand, job openings, and more, select the View Labor Market Information for [your occupation] link. See Occupation Profile for details.
-
Select the Save button to save your Desired Occupation.
Desired Salary
-
To modify your Desired Salary, select it to display a pop-up window.
-
Use the Desired Salary drop-down list to select a minimum salary or you can choose ANY/NEGOTIABLE.
-
To Update background information with desired salary, select the checkbox.
-
To Update all résumés with desired salary, select the checkbox.
-
To compare the cost of living between two different locations, select the Cost of Living Comparison link. See Compare the Cost of Living in Different Areas for details.
-
To view an Occupation Profile with information on wages, demand, job openings, and more, select the View Labor Market Wage Rates for [your occupation] link. See Occupation Profile for details.
-
Select the Save button to save your Desired Salary.
Desired Job Location
-
To modify your Desired Job Location, select it to display a pop-up window.
-
Select the Edit button to display the Desired Location page, which lets you indicate where you want to work.
-
To Update background information with the selected location, select the checkbox.
-
To Update all résumés with the selected location, select the checkbox.
-
Select the Save button to save your Desired Job Location.
See Specify Your Desired Job Location for additional information.
Desired Job Type
-
To add or modify your Desired Job Type, select it to display a pop-up window.
-
Select the Add New Profile button to set up a profile of desired job parameters, such as the days of the week and hours you can work, commute distance, and more (multiple profiles are allowed).
-
Complete all required fields (marked with a red asterisk), and select the Save button.
-
-
Select the option button in the Display on Résumé column to let employers and recruiters know your desired schedule.
-
To open a profile for editing, select the Editbutton.
-
To remove a profile, select the Delete button, and Ok on the confirmation pop-up.
-
Select the Save button to save your Desired Job Type.
See Specify Your Desired Job Type for details.
Drivers License
-
To add or modify your Drivers License information, select it to display a pop-up window.
-
Complete all required fields (marked with a red asterisk), and select the Save button.
-
See Add or Edit Driver's License Information for details.
Security Clearance
-
To add or modify your Security Clearance, select it to display a pop-up window.
-
Choose your level from the What is your current security clearance? drop-down list.
-
Select the Save button to save your Security Clearance.
Job Skills
-
To add or modify your Job Skills, select it to display a pop-up window, showing the skills that you previously selected for each skill category.
-
To change the skills you have listed, click the Modify Skills button. The page expands and opens for editing.
-
Check or uncheck the boxes for each skill category.
-
Select the Save button to save your changes.
-
Select the Close button to close the Job Skills page.
Tools and Technology
- To add or modify your Tools and Technology, select it to display a pop-up window, showing the tools and technology that you previously selected.
-
To change the skills you have listed, choose one of two options:
-
Select the Add tools and technology by keyword button. The Search Skills By Keyword page displays.
-
Select the Add tools and technology by occupation button. The Occupation Quick Search page displays. See Search for an Occupation for details.
-
-
Search for and identify your tools and technology skills as needed.
See Add or Edit Tools and Technology for additional information.
Typing Speed
-
To add or modify your Typing Speed, select it to display a pop-up window.
- Select your Typing Speed from the drop-down list.
-
Select the Save button to save your changes.
Language/Proficiency
-
To add or modify your Language/Proficiency, select it to display a pop-up window.
-
To add a language, select the Add a new Language button.
-
Select your Language and Proficiency from the drop-down lists.
-
Select the Save button.
-
-
To modify a language record, select the Edit button.
-
To remove a language record, select the Delete button and Ok on the confirmation pop-up.
-
Select the Save button to save your changes.
Templates
Using templates with your résumé
-
To change the content and layout of your résumé, select the name of the currently applied template (e.g., Chronological - System Template) in the Template field. A list of system templates and custom templates saved by you displays.
-
Select a template thumbnail icon to apply it to your résumé.
-
-
To modify the template, select the gear icon to display the template options.
-
Make changes as desired, select the Close button, and Ok on the confirmation.
System templates cannot be modified, but you can save them as a new, custom template of your own that can be modified.
See Work with Résumé Templates for additional information.
Tips for Success
Think of your résumé as a living document—something you update, refine, and customize regularly, not a one-time project.
Whether to include a profile picture on your résumé depends on where you’re applying, the role, and cultural norms. Points to consider:
-
Photos are generally discouraged because they can introduce bias (age, gender, ethnicity) and run into anti-discrimination laws. Recruiters often prefer clean, text-focused résumés.
-
If the résumé is more of a branded one-pager you hand out at events, a photo can add a personal touch.
-
A photo can reinforce your personal brand and help recruiters remember you in creative industries like design, media, performing arts, or marketing.
-
If you do include one, use a professional headshot with a neutral background, good lighting, and business-appropriate attire.