


Add an Appointment
Overview
You can use the Appointment Calendar to add your own appointments. Events you sign up for in the system show up automatically, but it’s also helpful to add any other appointments so everything is in one place. This makes it easier to plan your day and avoid double-booking yourself.
Complete Appointment Details
Where to Find This Feature
-
Top menu bar > Calendar icon > Appointment Calendar button > Add Appointment link
-
Left navigation menu > Other Services > Appointment Center > Appointment Calendar > Add Appointment link
-
Left navigation menu > My Individual Workspace > My Resources > My Appointments > Add Appointment link
-
My Dashboard > Widgets > My Calendar widget > New Appointments link > Add Appointment link
-
My Dashboard > Your Statistics > Messages > [number] New Appointments > Add Appointment link
-
Directory of Services tab > Other Services > Appointment Center icon > Appointment Calendar icon > Add Appointment link
Steps to Add an Appointment
Your site may display different options from those shown here.
-
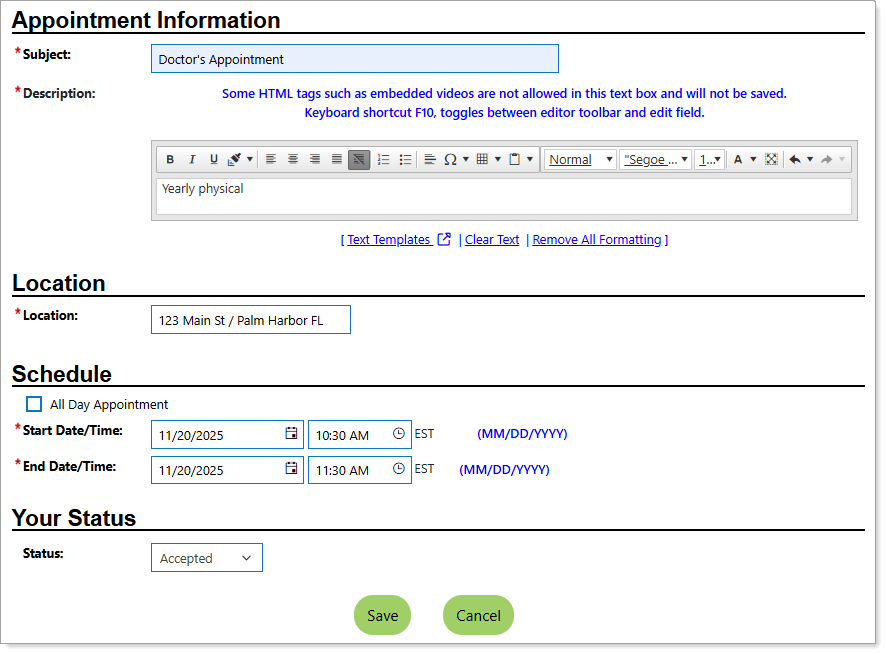
Enter the Subject and Descriptionfor the appointment in the Appointment Information section. You can format the description text to your liking, if desired.
 Customize your text
-
Enter your text using any of the following methods:
-
Type it in manually.
-
To display your text templates that you created, select the Text Templates link :
-
To view the contents of the template, select the magnifying glass icon in the Preview column.
-
Select the link in the Description column to apply the template to your text field.
-
Select the Manage Saved Text link to navigate to your Saved Text Template page, where you can create and manage your templates. See Manage Your Saved Text Templates for details.
-
To view a list of impactful terms that convey initiative and achievement, select the Action Words tab. A filterable list of verbs, divided by category, displays—select the words you like to add them to your text.
-
-
To enter system-generated text based on the context in which it is being created, select the Insert Sample Text link. Some text entry fields do not have this link (e.g., email messages).
-
To use template variables (if available)—these are placeholders that get replaced with actual data when the message is generated—select the Insert Variable link, and then select a variable from the list, such as name, address, etc.
-
-
To enhance your content, use the formatting tools at the top to bold, italicize, create bullet lists, adjust colors, include images, and more—adding clarity, emphasis, and visual appeal.
-
To remove the entry, select the Clear Text link.
-
To remove bold, italics, bullets, etc., but leave the content, select the Remove All Formatting link.
-
-
Enter theLocationof the appointment in the field provided.
-
Enter the schedule by doing one of the following:
-
To indicate an all-day appointment, select the All Day Appointment checkbox.
-
Enter the Start Date/Time and End Date/Time for this appointment by first selecting the calendar icon to choose a date, and then selecting the clock icon to choose a time of day.
-
-
Optionally, you can use theStatusdrop-down list to indicate if this appointment isAccepted, Tentative, or Declined.
-
Select the Savebutton to add your appointment to the calendar. The calendar redisplays with your appointment shown on the specified date.
You can hover over it to review the details. See Manage Your Appointment Calendar for additional information.