 Left Navigation Menu


Create or Edit a Custom Template
Overview
A well-made template ensures your résumé has a clean, organized, and professional appearance. This helps you make a strong first impression and ensures recruiters can easily scan and find important information like your experience, skills, and education. To manage the “look and feel” of your résumé(s), simply change from one template to another. Several system templates are available for use. They cannot be modified, but you can use them as a basis to create a custom one. You get to decide which sections to include (e.g., Objective, Ability Summary, References), what to name those sections, and where those sections appear in your résumé.
Editing a custom résumé template lets you stay current with your preferred formatting and content, or you can use it as starting point to craft a new customized résumé template to highlight what is most relevant to your desired occupation (e.g., skills first for a career changer).
Résumé Builder — Creating a New Résumé Template
Where to Find This Feature
-
Top menu bar > Résumé icon > Résumé Manager button
-
Left navigation menu > Quick Menu > Résumé Builder
-
My Dashboard > Widgets > Job Seeker Services widget > Résumé Builder link
-
Directory of Services tab > Services for Individuals > Job Seeker Services icon > Résumé Builder icon
Steps to Create or Edit a Custom Template
Your site may display different options from those shown here.
-
Open your résumé for editing using one of two methods:
-
Select the résumé thumbnail icon itself.
-
Select the gear icon on the résumé thumbnail and choose the Edit link.
-
-
On the Résumé Builder page, select the template gear icon to display the Edit Template page for the currently selected template (a system template if you have not yet created one). A system template displays in read-only mode and does not accept changes.
Although you cannot edit a system template, you can save it as a custom résumé template first.
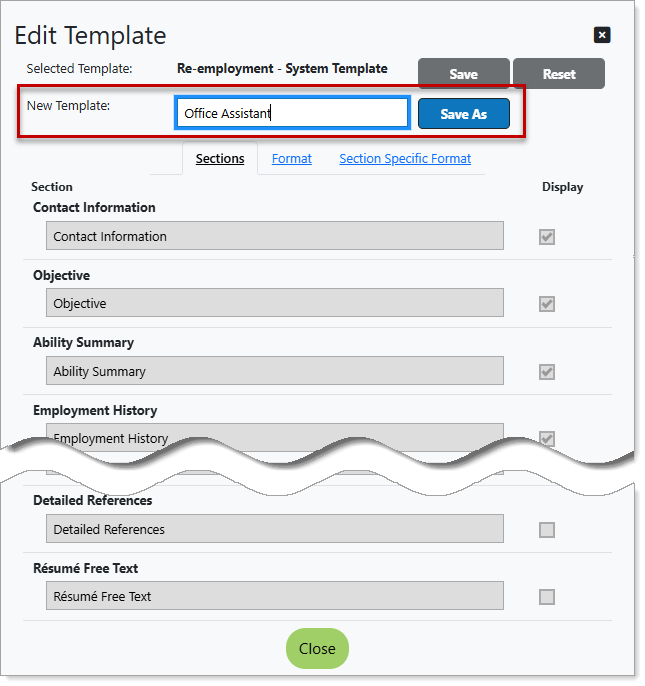
Edit Template Page
-
Enter a descriptive name for your template in the New Template field and select the Save As button. The page refreshes, and for those starting from a system template, the fields open for editing. Your template name is now reflected in the Selected Template field.
-
Change the format and content (as described below) and select the Save button at the top of the page to save your custom résumé template.
The Edit Template page includes three tabs, each dedicated to a specific area of customization—Sections, Format, and Section Specific Format. These tabs are where you make all changes to how your résumé appears, from adjusting section order and spacing to choosing fonts and styles. As you modify settings within these tabs, the résumé preview updates instantly so you can see the effect of your changes in real time.
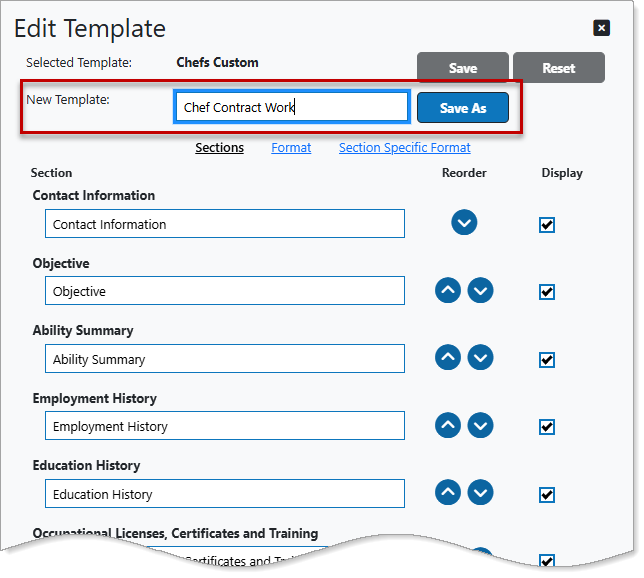
Sections Tab
This tab determines the content and ordering of the information on your résumés that use this template.
-
Check the box in the Display column for each section to be included on your résumé.
-
To change the name of a section, edit the section label.
-
To determine the order in which the selected sections appear, use the up and down arrows in the Reorder column. The item list display changes as you make your choices.
-
Select the Format tab.
Format Tab
This tab determines the fonts and alignment for the title, body, and subheads for this template.
-
Select the formatting for each component (alignment, font, text size, style) using the drop-down lists and option buttons to customize your content presentation.
-
Select the Section Specific Format tab.
Section Specific Format Tab
This tab determines the fonts and alignment for the contact information, employment and education history, and certification information sections of this template.
-
Select the formatting for each component using the drop-down lists and option buttons to customize your content presentation.
Select the Save button at the top of the page to save your custom résumé template.
Tips for Success
-
Tweak your custom résumé templates to tailor your résumé(s) so it reflects your unique background, goals, and the occupation you are applying for, such as emphasizing specific skills or rearranging sections to highlight relevant experience.
-
Assign your custom résumé template names according to their purpose (e.g., Staff Accountant, Management Accountant, and Payroll Administrator).
-
If you want even more control over how your résumé looks than what custom templates provide, consider uploading a formatted file version (in MS Word or PDF format). That way, your online résumé looks exactly as you designed it in Microsoft Word™ or other word processing application. See Upload a Résumé File for details.